Let's Try it!

Learning to be a better mommy one day at a time.

Snake Bubbles September 4, 2012

Filed under: Uncategorized — vjones10 @ 4:20 am

Here is a really quick and easy activity to do with your toddler. I saw this on this blog http://www.housingaforest.com/rainbow-bubble-snakes/.


What you need

Empty water bottle

fuzzy sock

Thick Tape (i used electrical tape..of course)

Tupperware bowl

liquid dish soap

water

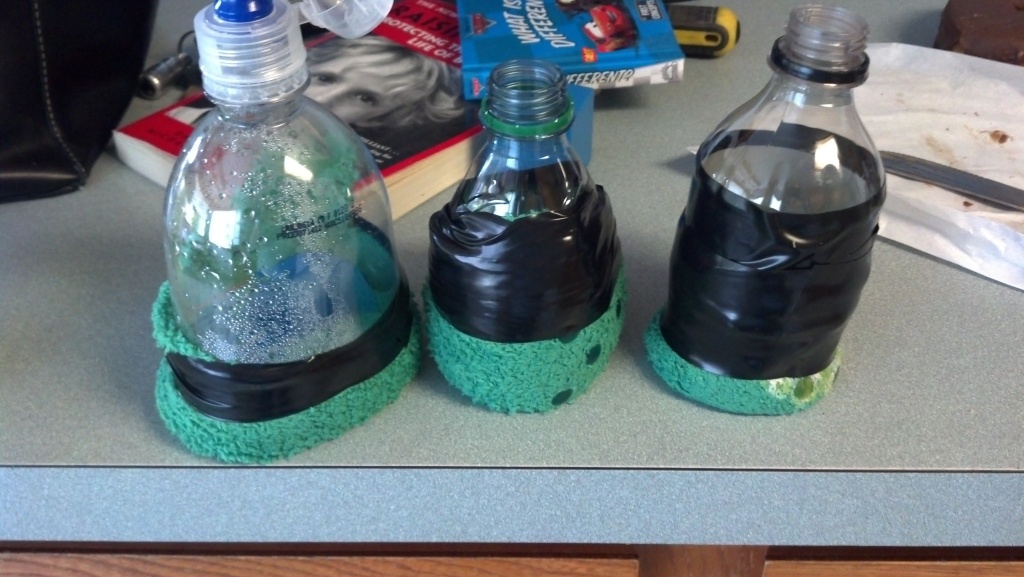
First I cut the water bottle in half, discarded the bottom part. Next wrap a sock around the open part of the bottle, and cut off half the sock, leaving at least 2 inches of sock coming up the bottle. Then wrap the crap out of the sock with tape to stick to bottle. I notice the bottle with the most tape worked the best (the far right in pic above). Now put 1/4 cup of liquid dish soap in a tupperwear container & add 3 TB of water. That’s it!

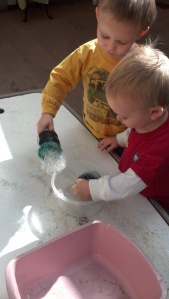
Sharing the soap, thats what I like to see boys!

Now take the fuzzy sock end and dip it in the soapy water.

It doesn’t take much to get big bubbles!

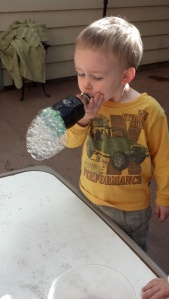
Next blow into the water bottle and watch your snake bubble appear!

The snake bubble can get really long if you have lots of soapy water on the end

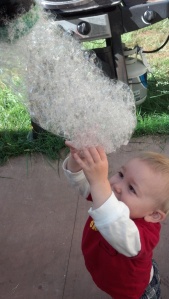
The boys really loved these bubbles. J thought it was soo neat he could barely wait for me to rip the bubbles off the bottle and let him grab it.

The bubbles float in the air in a big clump, J loved chasing it.

We had a fun bubble day!

You can also use a few drops of food coloring in the soapy water for bright-colored bubbles!


The Alphabet MONSTER! August 25, 2012

Filed under: Uncategorized — vjones10 @ 4:24 am

Here he is the Alphabet Monster! I saw this activity on Pintrest here http://www.littlefamilyfun.com/2012/05/alphabet-monster-game.html . So I decided to give hit a shot. Seemed simple enough. So last night I went through our cardboard recycling and found an empty ziplock cardboard holder. Then I gathered my materials.

Here is what you need:

Cardstock Crafting Paper

Tape

Scissors or extacto knife

an empty container

Marker

First I took my empty ziplock cardboard container and taped the opening shut. Then folded and taped my cardstock around the box like wrapping a gift. I cut out his mouth with an exacto knife through both layers of paper & cardboard. Then I cut a small hole opposite the mouth on the back side of the box, so the letters could fall out. Then I cut out some eyes, teeth, foot & hands. Taped those parts on and done!

To make the letters I cut up some circles and wrote a letter on each. I actually did two of every letter because I knew L & J would want to feed the monster each letter themselves. I also took a blank sheet of paper and wrote out letters on it to match the circle letters.

Now it was time to start the game!!

I showed them the Alphabet Monster and they got crazy excited, both reaching up saying “Me try! Me try!” I then sang a made up song about follow me to play the Alphabet Monster game, and ended the song with the ABC song. Now that we were at the train table, I said the Monster was very hungry and asked them if they could feed him. I put out all the letters on the table and told them to find the A circle for the monster. I pointed at the paper I used with the Alphabet on it and they searched through the letters finding the A. L shoved the A right in the Monsters mouth. I continued going through the letters. I was also the monsters voice and would make “num num” sounds when they were feeding the monster, and would say “more please.” They loved it!

I will probably make another Alphabet Monster for the next time because they both wanted to feed the monster at the same time, very exciting game. I also would have them repeat the letter each time the fed the monster.

It was a very fun and fulfilling 25 minutes of alphabet activity. If I wasn’t so uncomfortable sitting at the table I would make a monster with felt and hot glue gun, a little more durable, but at 35 weeks pregnant, anything I could craft sitting on the couch with my tiny side table will do for now. I hope you enjoy a good game with the Alphabet Monster soon!
 

Painting August 21, 2012

Filed under: Uncategorized — vjones10 @ 9:21 pm

I am sure there will be many post about specific painting projects we do but the one I love the most is the kind where I grab objects for L & J to paint. We started off todays painting activity with wooden blocks (I scored a giant bag of these pre cut blocks & shapes from the thrift store for $1) then I grabbed a pool noodle (found at dollar tree) and cut it up into wheels. I already had washable paint in these tiny containers that are Melissa & Doug brand, but have been washing out the containers when empty and refilling with the giant washable paint bottles I get at Wal-Mart. This way the kids can dip their paint brushes in the individual color container or dump it out and I don’t have to worry about them using all the paint in one project.

Ordinalry when I’m not pregnant I would run or play soccer to relieve stress in me, but since I can’t do that I’ve discovered painting is very therapeutic for me. I sat there with L and painted the ends of the pool noodle wheels for 20 minutes, not worrying about anything, it was a nice break. So we painted while J napped and when we were done we put our items outside to dry.I think with multiple objects to paint and not a set of instructions, L paints for longer stretches of time. Although he enjoys an instructional paint project in between free paint. Excuse the diaper pic above, we are in middle of potty training 🙂


Tongs & Puffs

Filed under: Uncategorized — vjones10 @ 9:08 pm

This activity helps learn colors, sorting, and motor skills.

You Need:

1 or 2 bags of colored puff balls or soft blocks (found in dollar tree)

tongs (found in dollar tree)

clear container (found in dollar tree, I used mason jars I already had)

I seperated 2 different colors (yellow & green) before I introduced game to boys. I put the pile of puffs and squares on the carpet with the two empty mason jars. I put a green puff in one jar and a yellow in the other. I gave J & L tongs and said, “Let’s try to pick up the puffs & squares and put them in the jars.” They were very eager to try. I was surprised how fast J (almost 2) got the hang of using the tongs with one hand. I asked if they knew what color the puffs & squares were. They guessed and I told them to try to put all the green colors in this jar (pointing to the mason jar with 1 green puff) and put all the yellow shapes in here (pointing to the mason jar with 1 yellow puffs). It kept them entertained for a good 15 minutes, then they went around the room seeing what other objects they could pick up. I ended the game when the tongs become swords 🙂


Flash Card Game August 17, 2012

Filed under: Toddler activities — vjones10 @ 4:50 am

flash card board

Today I was taking inventory of my overflowing unorganized bookshelf where I store all their activities and crafts (I will soon be getting new storage bins and need to know how many and what size) and thought I need to do something with these darn flash cards. I’m not sure about the rest of the world but my boys won’t hold still long enough to learn from flash cards. So I created this game to keep their focus and try to learn something new at the same time.

Here is what you need:

8 ziplock bags (big enough to hold a flash card)

Wide Tape; electrical tape, duck tape, or packing tape

A Large piece of cardboard

Flashcards

Fly swatter

I already had a giant piece of cardboard that I had hot glued this plastic picture on it a long time ago thinking boys would play cars & boats on it, but they never got really into it. I took 8 ziplock bags and placed them on board (like above pic). Next I grabbed electrical tape (hubby is an electrical so I’m always flushed with this tape) and in one big piece wrapped it over the bottom of the bags on each side. Then I wrapped it around the bags again near the openings of the bags, but not where the seal is.

Almost done!

Now insert a flash card into each ziplock bag and seal bag. Give your kiddo the fly swatter (all my dollar tree store had were these GIANT fly swatters) and tell him to hit one of the flashcards.

My L LOVED it. He would try to think really fast and hit the right card. When he slapped the correct card I would yell DING DING DING! When he hit the wrong card I would say “Try again” in a robot voice. After he correctly slapped all the cards I swapped out them out for new cards. We played this game together for 20 minutes, it was really fun. I will try it will J tomorrow but I have a feeling a fly swatting war might break out..oh well, every game can’t be perfect.

L slapping away


Goop!

Filed under: Uncategorized — vjones10 @ 3:35 am

Here is an activity that is great for 1-3 year olds, probably older too! I have seen lots of variations of Goop on multiple blog boards but this one I must say is by far the best. Kids can mix it together and the goop stays together so you’re not left picking up pieces everywhere afterwards.

Here is what you need:

Glue (clear or white) I used clear

Liquid Starch

Food coloring

glitter (optional)

plastic cup

plastic spoon

disposable table-cloth (I used a dollar tree shower curtain)

yes that is a gallon of clear glue…I’m crafty!

Lay out your disposable table-cloth (or shower curtain). Next you can pre mix the liquid starch & glue and have your toddler put in food coloring or you can see if they can mix it all. The ratio I used that seemed to work great was 1 1/2 cups glue mixed with 1 1/2 cups liquid starch.  Now add a few drops of food coloring and mix well. I also added glitter to mine!

Dump the goop out of the cups and let the fun begin!

At first both boys were not sure what the heck this stuff was…

L stuck his with a spoon a few times, then pushed it over to J. Of course L doesn’t like to get his hands dirty.

J loves the stuff


He was trying to make a goop mustache


When they are all done, put all the goop in the middle of the table and wrap it up in the disposable cloth and to the garbage it goes. Pretty easy clean up. Also the food coloring didn’t really stain their fingers and J did get a bit on his shirt, but I just used a little bit of vinegar and out it came. Hope you have fun with this one!


Hot Lava Cushions August 15, 2012

Filed under: Uncategorized — vjones10 @ 4:54 am

I don’t know why I never have thought of this activity bc its super easy to create. This actually happen on accident when I took all the cushions off the couch to vacuum them. I guess I usually do this during nap time but since L decided he wasn’t going to nap he was “helping” me clean. Well as soon as the cushions hit the floor L started jumping and running all over them. I was actually surprised at how much laughter was coming out of him. So when J woke from his nap L showed him his new game. I then told them the ground was pretend hot and to stay on the cushions. Man they LOVED it! Seriously 30 minutes of crazy fun.

What you need:

Couch Cushions

J & L having a blast!

Take all the cushions off your couch and set them up on the floor and tell your kiddos to not touch the ground, stay on the cushions. Of course they might forget the game all together and start tackling each other, put as long as everybody is laughing and having fun it is ok.

J was a little tired afterwards. night night!


Treasure hunting through cottonballs

Filed under: Uncategorized — vjones10 @ 4:45 am

Since L had such a blast with his treasure hunting sensory bin it was only fair I make one for J. Although J is 14 months younger I knew he would eat the uncooked rice & beans in J’s bin, so I created a bin for him using cotton balls & balled up toilet paper. I didn’t want to do just cotton balls, because I thought J would pull one out and they would stick all together. So to add texture I rolled up squares of toilet paper.

Here is what you need

Cotton balls ( I used 1 pack of 100 big size )

toilet paper

a container (in my case an empty plastic cookie container)

random colorful objects

paper & marker


Now mix the cotton balls & crumbled up toilet paper in the container

(Sorry for the ugly carpet, its a rental house)

Next I searched around the house for colorful treasures I could put in the bowl. Before putting objects in bowl, draw a pic of each object on a piece of paper and how many they are of each object.

Insert objects into bowl and mix well.

I brought out the bowl and asked J if he wants to play a game. “Yes Yes!” he said. Next I told him we were going to find some treasure. As soon as the word ‘treasure’ left my mouth L jumped off the couch and ran over to us and asked to play too. I told him yes he could help J find treasure. I pointed at the piggy on the paper and said, “Let’s try to find the piggy!” J had such a happy smirk on his face when he used his hands to dig through the bowl. I knew the piggy was on top and he would probably find it first, which he did. Then L showed him how to put the treasures next to their pictures on the paper. They both had a fun time with this activity.

J searching for treasures


Marshmallow building August 13, 2012

Filed under: Toddler activities — vjones10 @ 4:00 am

L loves to build, whether it’s with legos or blocks but he loves to play with tiny items, which I never buy because I’m scared he will choke on them. Yes yes he is almost 3 years old and will probably not put tiny objects in his mouth but I would rather be safe then sorry. So I thought how fun it might be if he built stuff with marshmallows and toothpicks.

This is what you need

Box of toothpicks

marshmallows (I had big and tiny size)

Cheerios (optional)

I gave L a toothpick and a big marshmallow and said “Okay let’s try to build a snowman!” He stuck the toothpick in the marshmallow then proceeded to eat said marshmallow holding the end of the toothpick. Of course, duh mom that’s what a 2-year-old would do. So I showed him how to stick some toothpicks in a big marshmallow creating a snowman, then gave it to L. He then said “Ohhhh, umm foot?” and pointed to the bottom of the toothpick legs. I gave him a tiny marshmallow and said, “foot.” He stuck the marshmallow foot on and was so happy with himself he put the other foot, hands and head on.

L with his snowman after eating the head of it

Now I asked L if he could build the snowman a house with marshmallows, toothpicks, and Cheerios. He was very excited to try, still chewing on the snowman’s head.

The possibilities are endless on what to create with these 3 simple household items, until of course your toddler has eaten all the marshmallows & Cheerios. Advice, do this activity after dinner as a dessert treat or after nap time. Have fun!! We did.


Treasure hunting in a sensory bin August 10, 2012

Filed under: Toddler activities — vjones10 @ 9:11 pm

I have seen tons of blogs showing you how to create great sensory bins for young kids, especially toddlers. My L however can find them somewhat less entertaining, so I made a game out of it.

What you need

A bin or shoe box with lid

beans and/or rice

tiny objects

a spoon

a small piece of paper

In our bin I chose random object from around the house, green army men, big batteries, foam blocks, puffs, blue gems, a plastic fork…My bin is from the dollar tree as most of the items in the bin including 2 bags of dry beans. I already had a bunch of uncooked rice on hand to fill the bin as well. I took inventory of all the items and wrote down how many of the item there was and draw a picture of the item in the color they were.


I gave L the list and the bin with a spoon and said “Let’s find treasure!” He was sooo excited! He scooped & scooped in the bin until he found an object. I told him to find the item on his list and he started matching each piece of treasure he found to his list. We also counted to make to see if we were missing any treasure. This is a keeper in my book of, he learns colors, numbers, and fine motor skills picking up the tiny treasures. When it was all over I collected his treasure and plan to make a new list with new treasure items.